How To Clean Soot? Complete A-Z Guide
Jan 27, 2026
Soot isn’t regular dirt. It’s fine, black, and easy to spread if the first step goes wrong. A quick wipe, the wrong cleaner, or too much pressure can turn a small mess into a permanent stain.
We’ll explain how to clean soot safely, how smoke residue behaves on different surfaces, and how to tell when cleaning works and when it stops being enough.
Key Notes
Dry removal must always come before moisture to prevent smearing and permanent soot penetration.
Walls, ceilings, fabrics, masonry, and electronics each require different soot-cleaning methods and limits.
Oily or embedded soot cannot be safely cleaned with standard household products.
When Soot Cleaning Is Safe to DIY (& When It Is Not)
There is a version of this job you can handle with patience and the right gear.
And there is a version that should not be a DIY project…
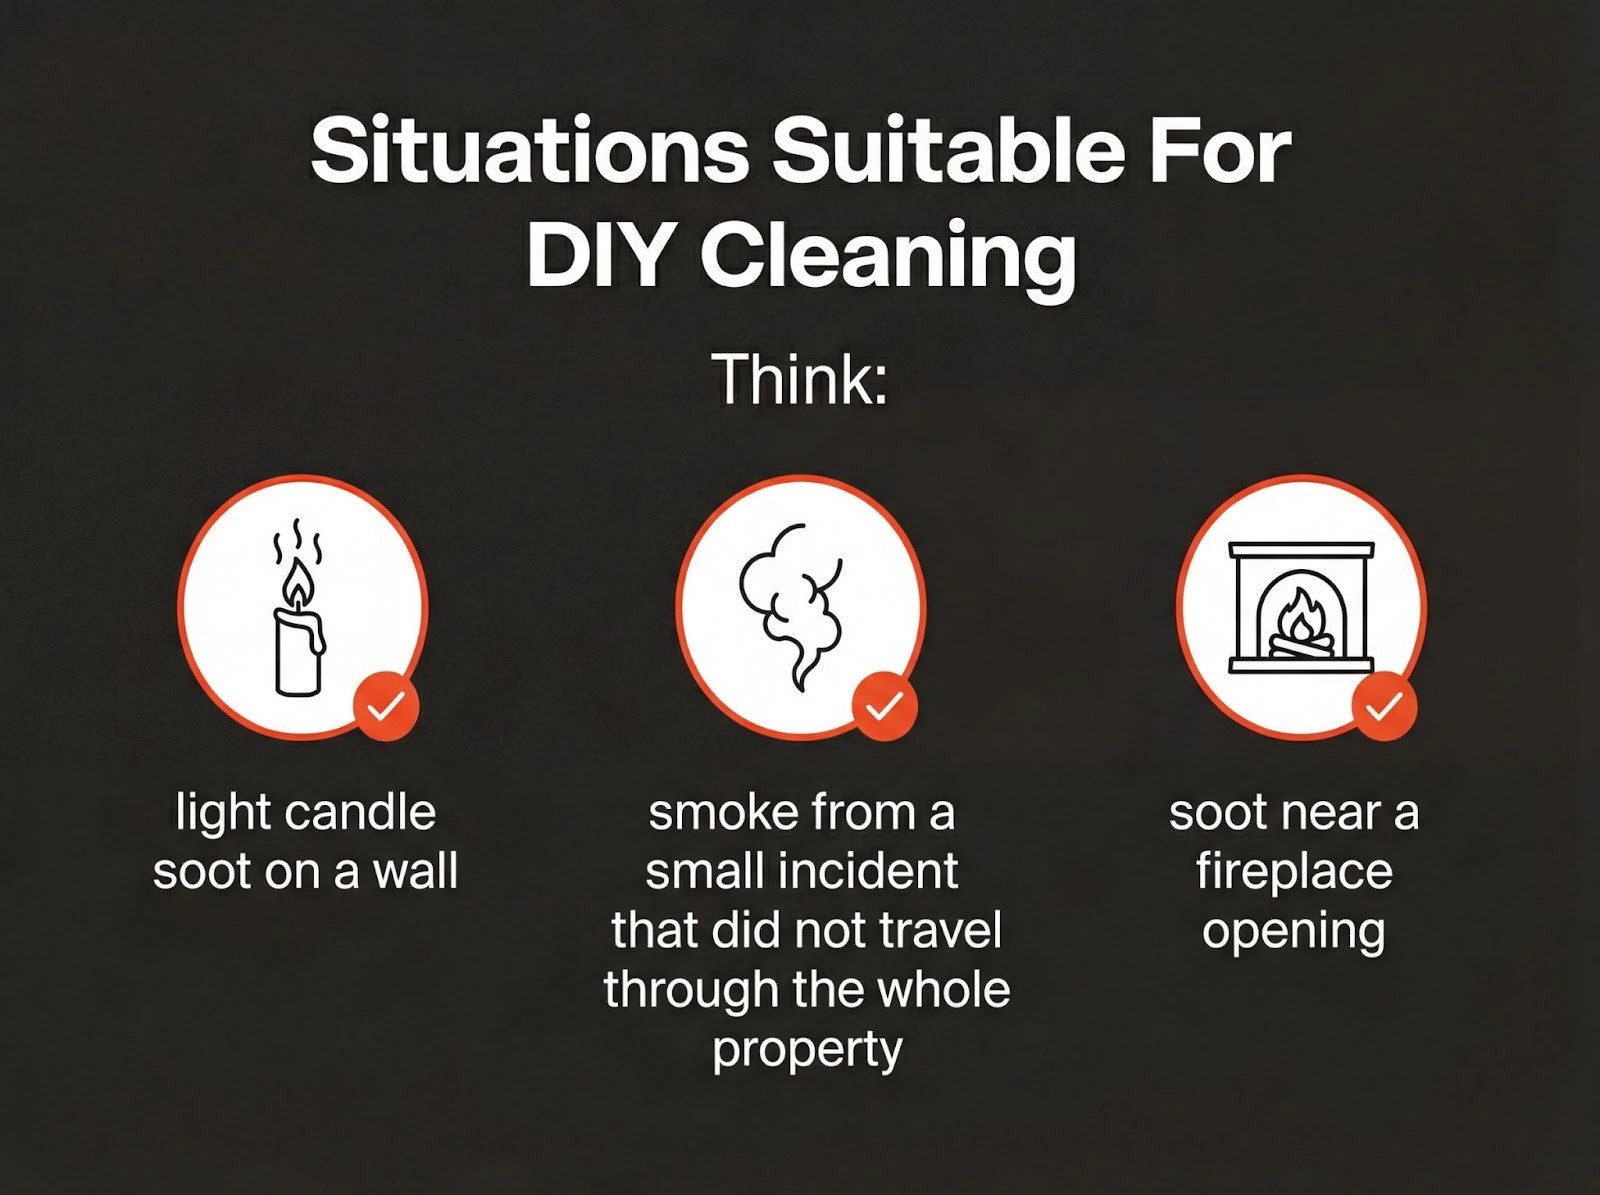
Situations Suitable For DIY Cleaning
DIY tends to be reasonable when the soot is:
Light, dry, and surface-level (powdery, not oily)
Limited to a small, contained area
Mostly on sealed or non-porous surfaces (tile, glass, sealed metal, some painted walls)
Situations That Are Unsafe For DIY
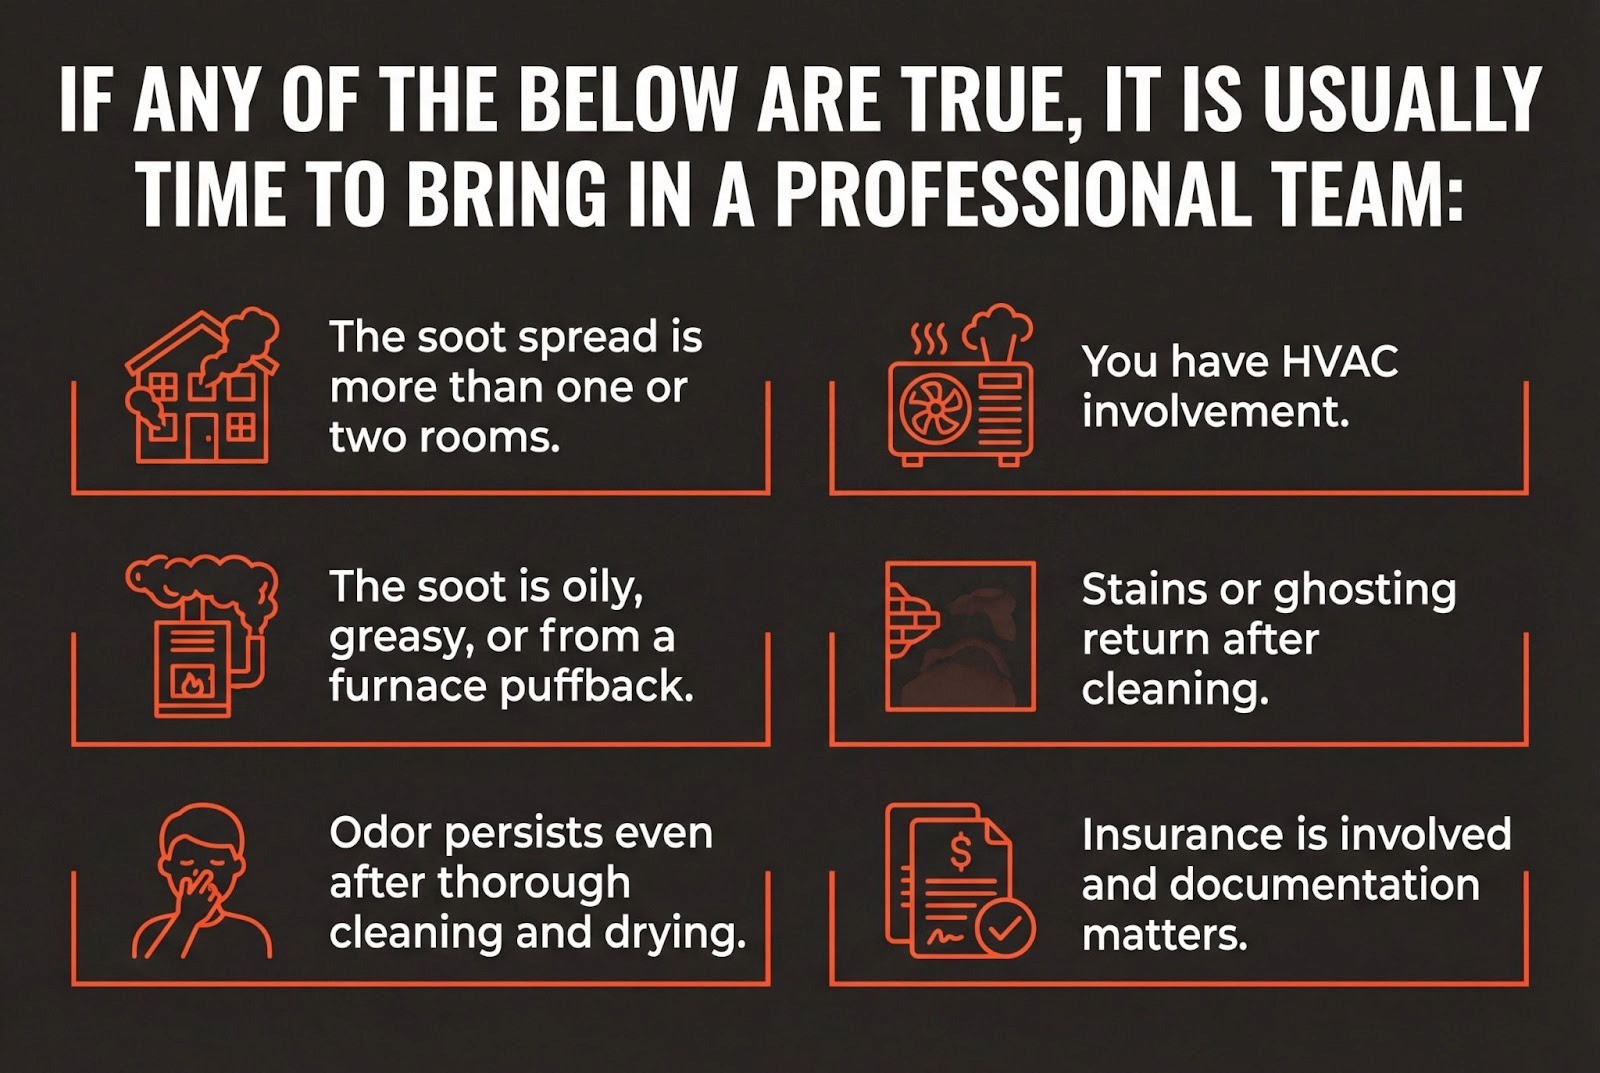
Stop and consider professional help if any of these apply:
Anyone in the home has asthma, COPD, immune issues, heart disease, pregnancy, or serious chemical sensitivity.
Soot covers multiple rooms or you have a strong smoke odor that will not quit.
Soot is on HVAC vents, inside returns, or around air handlers.
Soot is on outlets, wiring, breaker panels, appliances, or electronics.
The soot is oily or “puffback” soot from a furnace or oil burner. That stuff smears catastrophically.
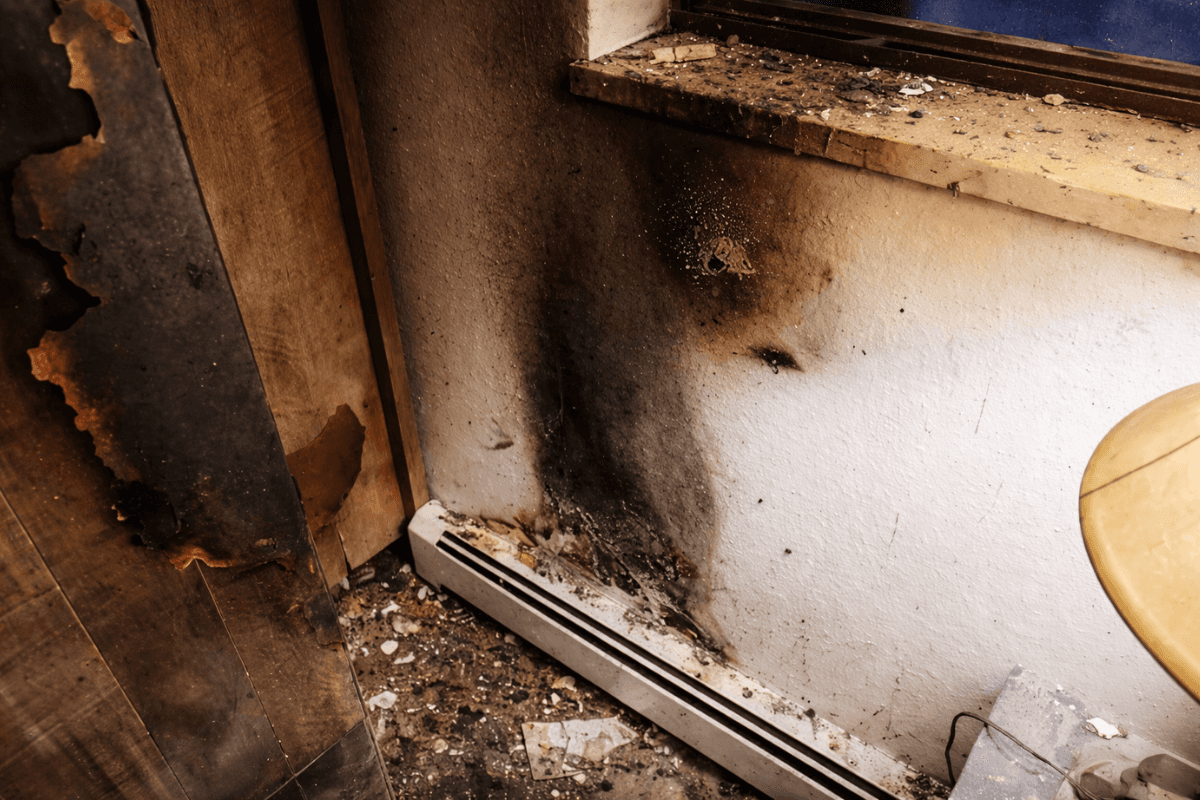
Soot is not only irritating. It can carry carcinogenic compounds like PAHs, and the very fine particles are easy to inhale when you disturb them.
Structural & Electrical Red Flags
If you see:
blistered paint
softened drywall
warped materials
or unknown burning sources (especially plastics or chemicals)
… cleaning is not the first step. Inspection is.
And if soot is around electrical systems, do not clean near live power. Conductive soot plus moisture is a short-circuit waiting to happen.
Safety Equipment & Room Preparation
If you do not prep properly, you will spend the rest of the day cleaning the soot you accidentally spread.
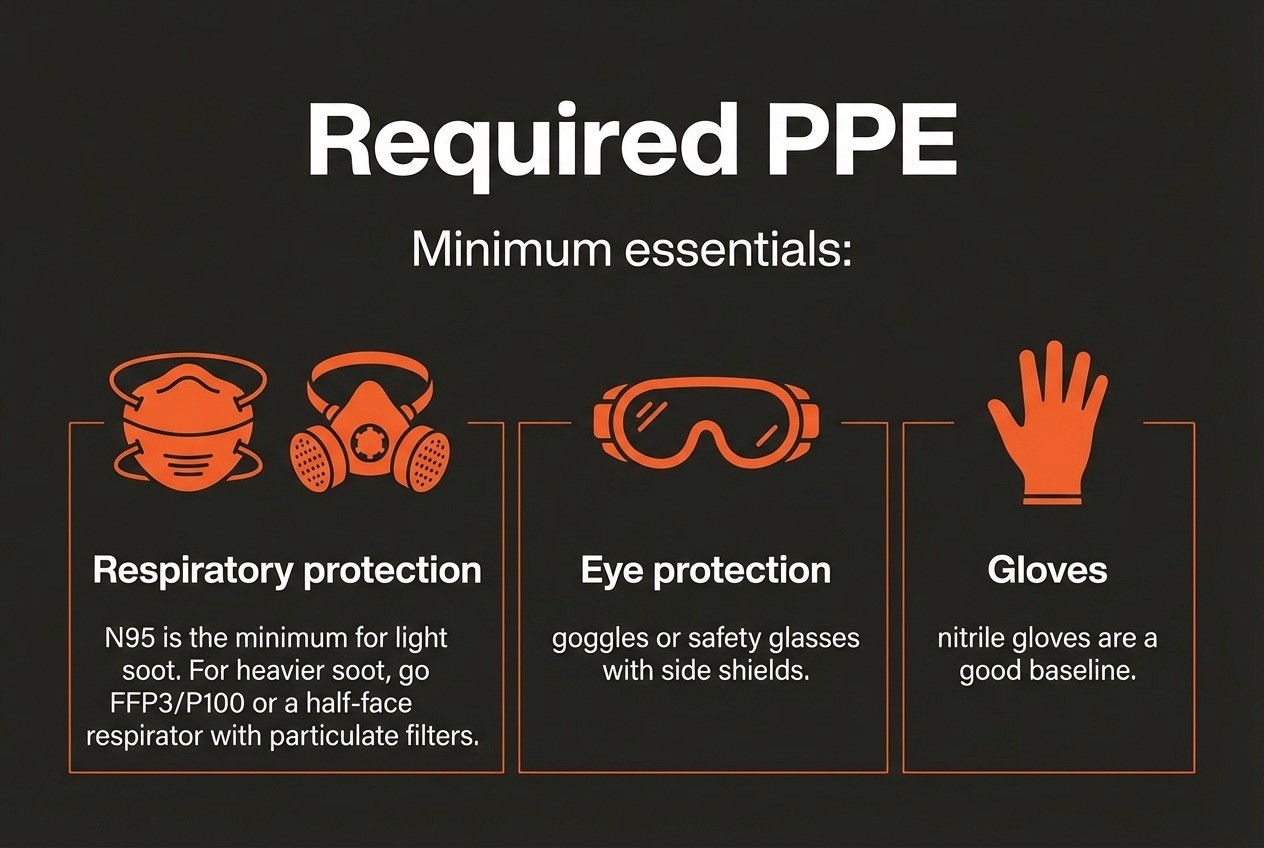
If the soot is heavier or you are working overhead, disposable coveralls (Tyvek-style), long sleeves, and shoe covers are worth it. Soot tracks everywhere.
Containment & Airflow Setup
Turn off HVAC. You do not want soot pulled into ducts.
Ventilate by opening windows and using an exhaust fan if you have one.
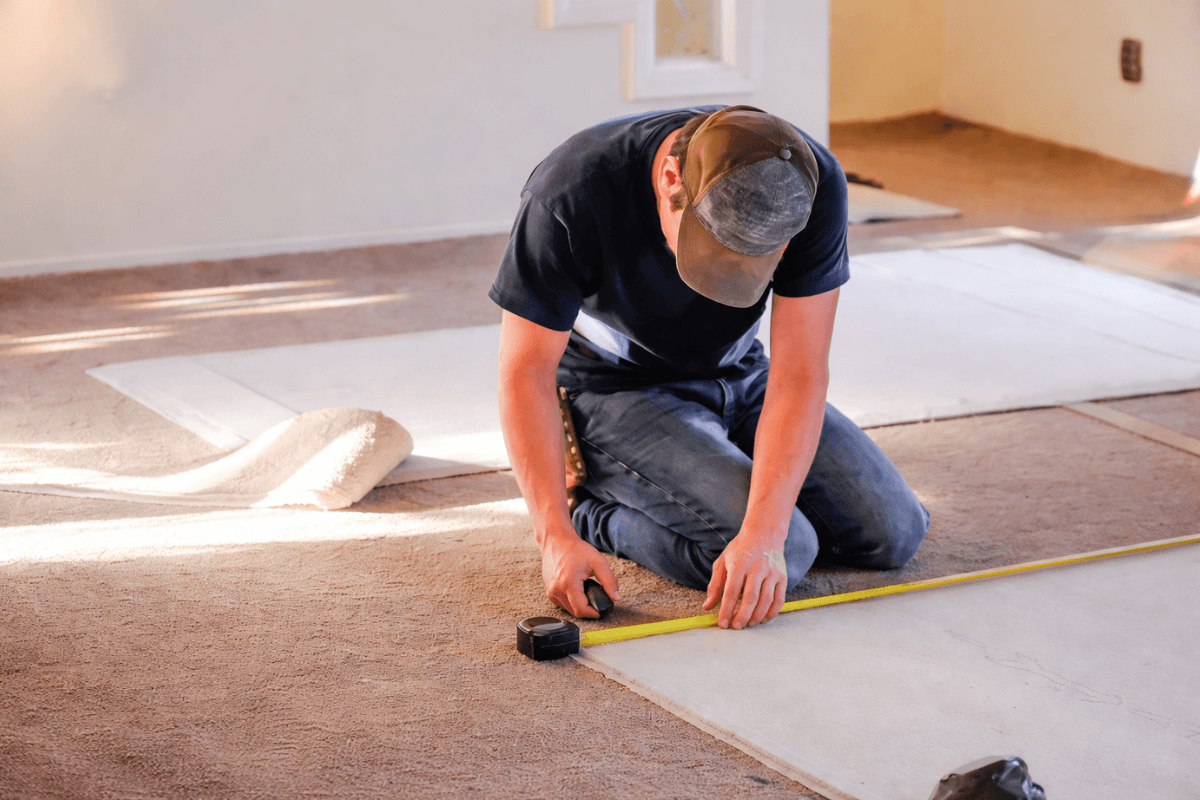
Protect floors and furniture with plastic sheeting or drop cloths.
Remove or fully cover textiles and electronics.
The Correct Order of Operations for Cleaning Soot
Why Dry Cleaning Must Come First
Soot is a mix of tiny particles and oily residues. If you add water before lifting loose soot, you create a black slurry that pushes into paint binders, drywall paper, and fabric fibers.
Dry methods keep particles airborne and captured. Wet methods compress and distribute.
Step-By-Step Cleaning Sequence
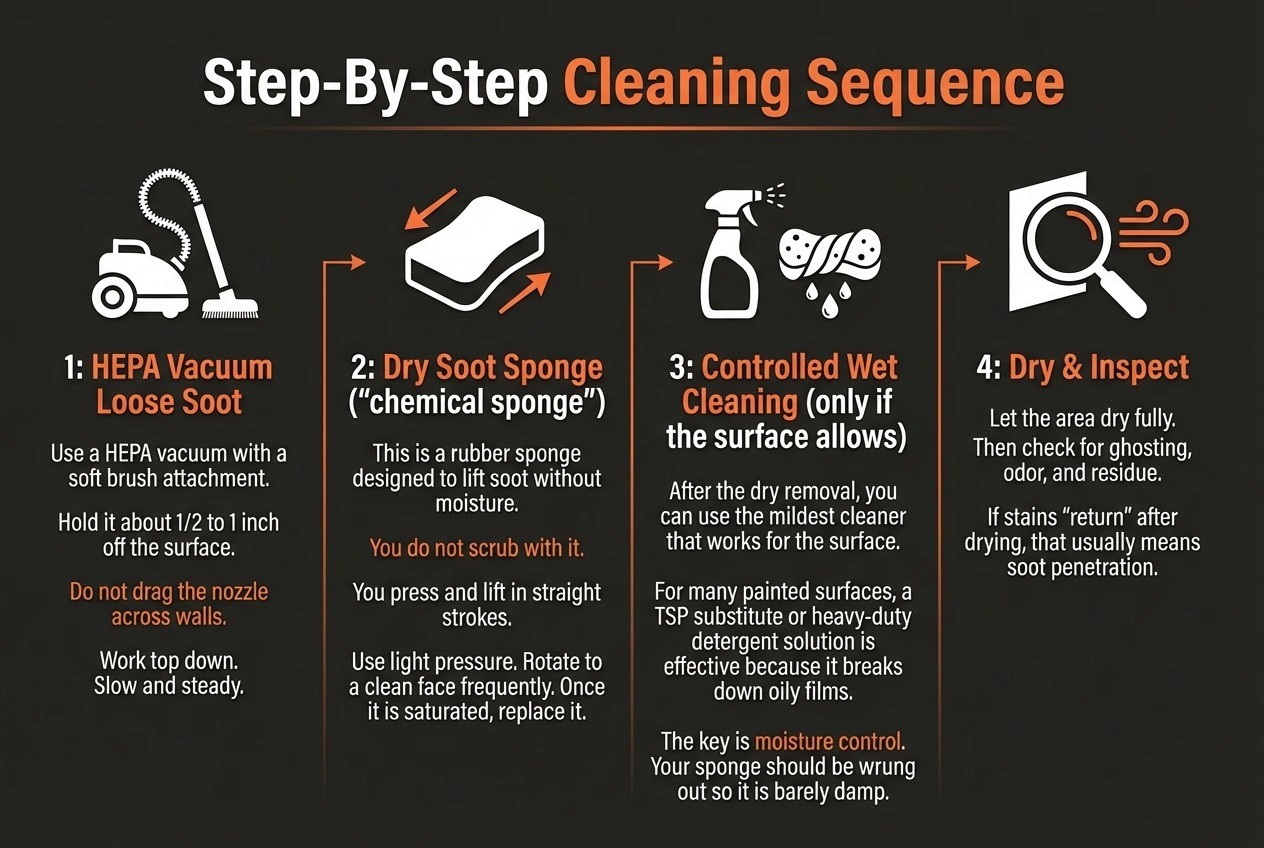
How Much Pressure Is “Right”
Think feather-light. Like you are handling a fragile painted surface, because you are.
Heavy pressure does two bad things:
It breaks soot particles into smaller pieces that embed deeper.
It creates rub marks and burnishing, especially on lower-sheen paints.
How To Clean Soot From Walls & Ceilings
This is where most people go wrong, because walls and ceilings are porous and unforgiving.
How To Clean Smoke Off Walls
Start by identifying what kind of wall you have.
Painted drywall (most common)
Dry removal first. HEPA vacuum, then soot sponge.
If residue remains – use a mild dish soap solution or a TSP-based cleaner, but only after dry removal.
Work top down in small sections. Rinse your sponge often.
Plaster walls (especially older buildings)
Plaster is more porous and sensitive to moisture. In many cases, you should stick to dry methods only. Even damp wiping can wick soot deeper and cause staining or surface breakdown.
If you are not sure whether your wall can tolerate wet cleaning, test a small hidden spot.
How To Clean Smoke Damage On Walls & Ceiling
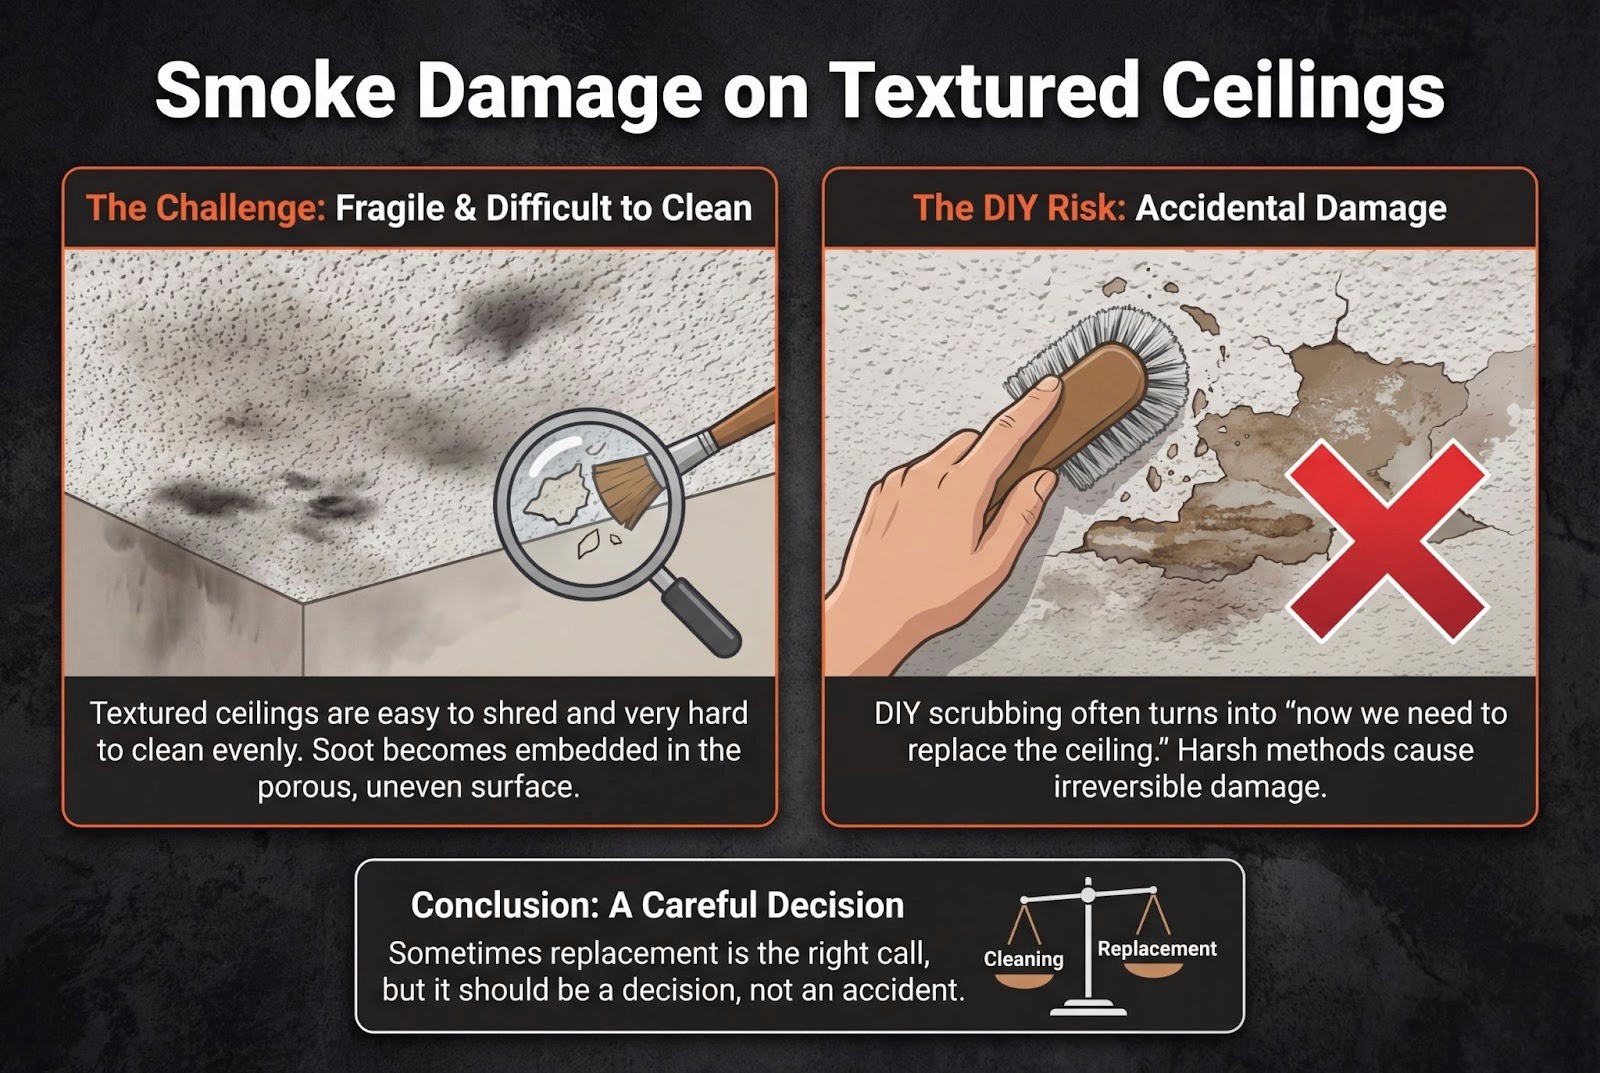
Ceilings are tougher because gravity works against you.
Always clean ceilings before walls. Anything you loosen overhead will fall.
Use a HEPA vacuum with an extension wand and brush attachment.
Use soot sponges with light, controlled strokes.
Paint Finish Matters More Than People Think
Flat paint: Absorbs soot and scuffs easily. Dry methods only. Wet wiping can lift paint.
Eggshell: More washable, but still prone to burnishing. Barely damp cloth only after dry removal.
Glossy: Resists stains but scratches easily. Avoid abrasive sponges and heavy rubbing.
If you are specifically dealing with smoke residue on walls (thin film, odor, yellowing), that is where a TSP substitute or restoration-grade cleaner can help because you are dissolving film, not just lifting particles.
Surface-Specific Soot Cleaning Methods
Fireplaces, Brick, Masonry
Masonry is porous, but it is usually tougher than drywall.
Make sure ashes are completely cold.
Remove grates and hardware.
Shovel out ash and bag it.
HEPA or shop-vac the remaining dust with a brush attachment.
For cleaning:
Mild option – 1 gallon warm water with about 2 tablespoons grease-cutting dish soap.
Scrub top down with a firm brush.
Wipe as you go to prevent streaking.
For heavier deposits:
Some people step up to dilute ammonia in water, but this is a hazard zone. Never mix ammonia with bleach or other chemicals. If you are not confident, skip it.
Heavy soot on brick can embed deeply and may require professional methods like media blasting or specialty detergents.
Glass, Metal, Sealed Surfaces
For fireplace glass:
A paste of wood ash and water can work surprisingly well.
A 1:1 vinegar-water solution also works for light deposits.
Use soft cloths or newspaper. Avoid abrasive pads that scratch glass.
For sealed metal and appliances:
Vacuum loose soot.
Wipe with a slightly damp microfiber cloth.
Dry immediately.
Wallpaper & Decorative Finishes
Wallpaper is risky.
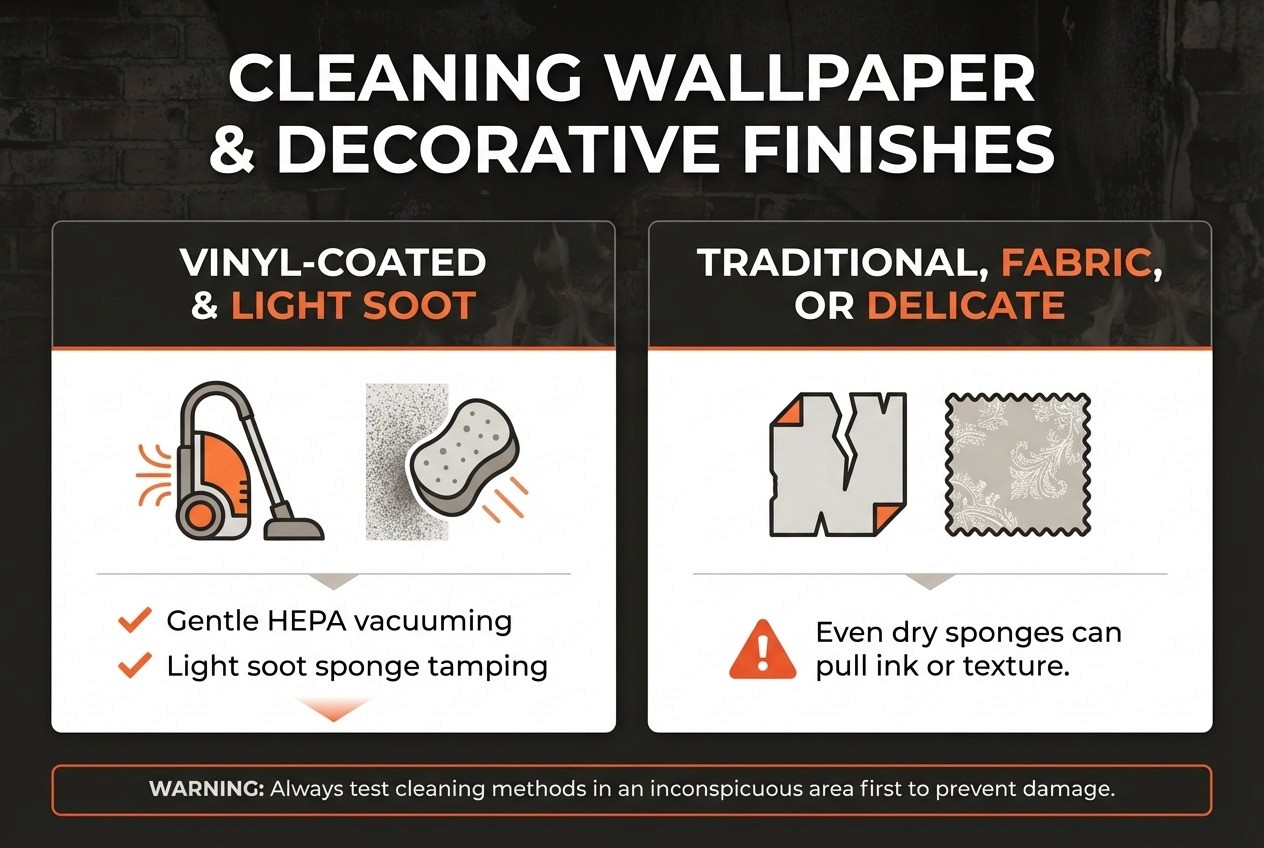
And any moisture can cause bubbling, peeling, and staining. If soot is embedded or there is odor in the wall system, removal and replacement is often the real solution.
Fabrics, Soft Goods & Contents
Clothing, Upholstery, Carpets
Take items outside if possible. Shake or tap them to release loose soot.
Then:
HEPA vacuum using upholstery tools.
Avoid rubbing stains. Rubbing pushes soot deeper.
For clothing and delicate fabrics, professional dry cleaning is often the safest move. Smoke odor and soot behave differently than everyday stains.
For carpets and upholstery, baking soda can help deodorize, but it is not a full fix for deep smoke contamination. It helps on the surface. That is it.
Electronics & Sensitive Equipment
Treat soot on electronics as a real risk:
Disconnect power immediately.
Remove batteries.
Do not power the device back on “to see if it works.” Conductive soot can short components.
For exterior cleaning, a soft microfiber cloth that is barely damp is usually fine.
For vents and ports, use compressed air to blow soot out, not deeper into the device.
Cleaners, Chemicals & DIY Solutions Explained
This is where people get brave in the worst way.
Safe Household Options & Their Limits
Grease-cutting dish soap: Good for light films and many surfaces.
Vinegar-water (1:1): Good for glass and some non-porous surfaces.
Baking soda: Mild abrasive on brick in paste form, or deodorizer for carpets after vacuuming.
Household cleaners can be fine for light soot. They struggle with oily soot and heavy smoke residue.
Professional-Grade Soot Cleaners
Professional cleaners often work better for two reasons:
They are more alkaline (often in the pH 10–13 range), which helps neutralize soot’s acidity and emulsify oily tars.
They are designed to rinse residue-free, which reduces ghosting and lingering odors.
TSP or a TSP substitute is common for painted surfaces and masonry, used exactly as directed.
Chemicals & Methods To Never Use
Bleach: it does not clean soot. It can damage surfaces and create dangerous fumes.
Ammonia mixed with anything: never do it.
Abrasive pads, steel wool, harsh powders: scratches and embeds soot.
Over-saturating drywall or ceilings: swelling and delamination.
How To Tell If Soot Is Fully Removed
Soot cleaning looks finished before it is finished.
Visual & Tactile Checks
After everything dries:
Wipe with a clean white cloth. If you get black or greasy transfer, you still have residue.
Look for “ghosting” marks returning (especially around outlets, vents, corners, and ceiling lines).
Odor & Air Quality Indicators
If the smoke smell comes back when the heat turns on, humidity rises, or the HVAC runs, that is a clue that smoke residue is still present in porous materials or ductwork.
Health & Environment Red Flags
If people get eye, throat, or lung irritation in the space after cleaning, do not write it off as sensitivity. Fine particles may still be circulating.
Painting & Sealing After Soot Cleaning
Painting too early is how soot damage becomes a recurring problem.
Drying Timelines
Let surfaces dry fully.
In many cases, that is 24–48 hours minimum. Longer if humidity is high.
Primer Selection
For smoke and soot situations, standard latex primer often fails.
Shellac-based primers are excellent at sealing odors and stains.
Oil-based primers also work well, though they dry slower.
The goal is a true barrier that locks in microscopic residue and odor compounds.
When Professional Fire Restoration Is the Right Call
Fire Restoration NYC handles soot and smoke damage the way it needs to be handled:
controlled containment
HEPA filtration
proper cleaning chemistry
documentation that makes sense if an insurer or property manager needs proof of mitigation
If you are not sure whether your situation is DIY-cleanable, that is a normal question. The risk with soot is not just the mess, but what the mess turns into when it is pushed deeper.
Want To Avoid Costly DIY Soot Mistakes?
We assess soot damage and guide next steps.
Frequently Asked Questions
Can soot cause permanent damage if it looks minor?
Yes. Even light soot can be acidic and continue etching paint, metal, and finishes over time. If residue is left behind, damage often shows up weeks or months later as staining, corrosion, or recurring odor.
How long after a fire should soot be cleaned?
As soon as it’s safe to enter the space. The longer soot sits, the deeper it penetrates porous materials and the harder it is to remove. Delays also increase odor issues and long-term surface damage.
Is soot cleaning different after a grease or kitchen fire?
Very much so. Grease and protein fires leave oily, often invisible smoke residue that standard DIY cleaners struggle to remove. These residues bond chemically to surfaces and usually require professional-grade cleaning and deodorization.
Can soot spread to clean rooms even if doors were closed?
Yes. Fine soot particles can travel through air gaps, ductwork, and pressure changes during the fire or cleanup. That’s why containment and HVAC shutdown are critical before any cleaning begins.
Conclusion
The difference between a clean surface and a permanent stain usually comes down to sequence, pressure, and knowing when to stop.
Dry removal always comes first. Moisture is used sparingly, only on the right surfaces. Paint type, wall material, ceilings, fabrics, and even electronics all behave differently once soot is disturbed.
When stains return, odors linger, or soot reaches porous materials or systems, cleaning alone is no longer enough.
Get a free quote from Fire Restoration NYC if soot cleaning feels uncertain, incomplete, or risky to handle alone. Our crews handle containment, HEPA filtration, proper soot and smoke residue removal, and documentation that holds up for insurers and property managers, so damage is addressed correctly instead of getting sealed in or spread further.